Create Message Maps
The Create Message Map page allows Data Administrators to manage how source data is transformed into the CryspIQ® Enterprise Data Model.
A message map connects fields from a Source Message to the appropriate Target Message fields in CryspIQ®. This is one of the most important steps in the CryspIQ® methodology because it gives raw source data the business context required for reporting, analytics and AI.
Overview
Message mapping answers four important questions:
- What source data has been received?
- What type of data is it?
- Where does it belong in the Enterprise Data Model?
- What business context, defaults, transformations and data quality rules should be applied?
The more context added during mapping, the more useful the data becomes for consumers, reports, analytics and AI engines.
Source Message Fields
        ↓
Suggested Mapping
        ↓
Data Administrator Review
        ↓
Target Message Fields
        ↓
Defaults, Preparation and DQ Methods
        ↓
Business Context
        ↓
CryspIQ® Enterprise Data Model
What is a Message Map?
A Message Map defines how fields from a source system are mapped into CryspIQ®.
For example, a source system may provide:
CustomerId
CustomerName
CustomerType
TransactionDate
InvoiceAmount
The Message Map determines how those fields align to the enterprise model, such as:
| Source Field | Target Field | Purpose |
|---|---|---|
| CustomerId | Entity Business Key | Identifies the customer |
| CustomerName | Entity Name | Provides customer context |
| CustomerType | Entity Type | Classifies the customer |
| TransactionDate | Fact Date | Provides transaction timing |
| InvoiceAmount | Fact Value | Represents financial activity |
Why Mapping Matters
Mapping is where source data becomes meaningful.
Without mapping, source data is just a collection of fields.
With mapping, data becomes:
- Searchable
- Governed
- Reusable
- Reportable
- Traceable
- AI-ready
Mapping applies the CryspIQ® methodology to source data by connecting raw fields to business meaning.
The better the mapping and context, the more valuable the data becomes for users and AI-driven use cases.
Data Types to Understand
Before creating a map, the Data Administrator should understand the type of data being mapped.
Master Data
Master Data describes core business entities.
Examples include:
- Customers
- Suppliers
- Employees
- Products
- Assets
- Locations
Master Data is usually used to describe who, what or where.
Reference Data
Reference Data provides classification or lookup values.
Examples include:
- Status codes
- Categories
- Countries
- Departments
- Product types
- Account types
Reference Data is usually used to provide meaning, grouping or classification.
Transactional Data
Transactional Data records business activity or events.
Examples include:
- Sales invoices
- Payments
- Orders
- Claims
- Measurements
- Meter readings
- Financial transactions
Transactional Data usually represents what happened, when it happened and how much was involved.
Financial or Measurement Data
Some transactional data represents values that need to be measured, aggregated or reported.
Examples include:
- Amount
- Quantity
- Balance
- Cost
- Revenue
- Volume
- Temperature
- Pressure
- Consumption
These values often become facts or measures in the Enterprise Data Model.
Business Context
Business context makes data relevant.
When mapping data, the Data Administrator should consider:
- What business object does this data relate to?
- What does this record represent?
- Who owns the data?
- What date or period does it relate to?
- What source system did it come from?
- What entity, product, location, service or asset is involved?
- Is this data master, reference or transactional?
- Is this field required for reporting, analytics, AI or governance?
Context helps CryspIQ® turn raw source data into trusted enterprise information.
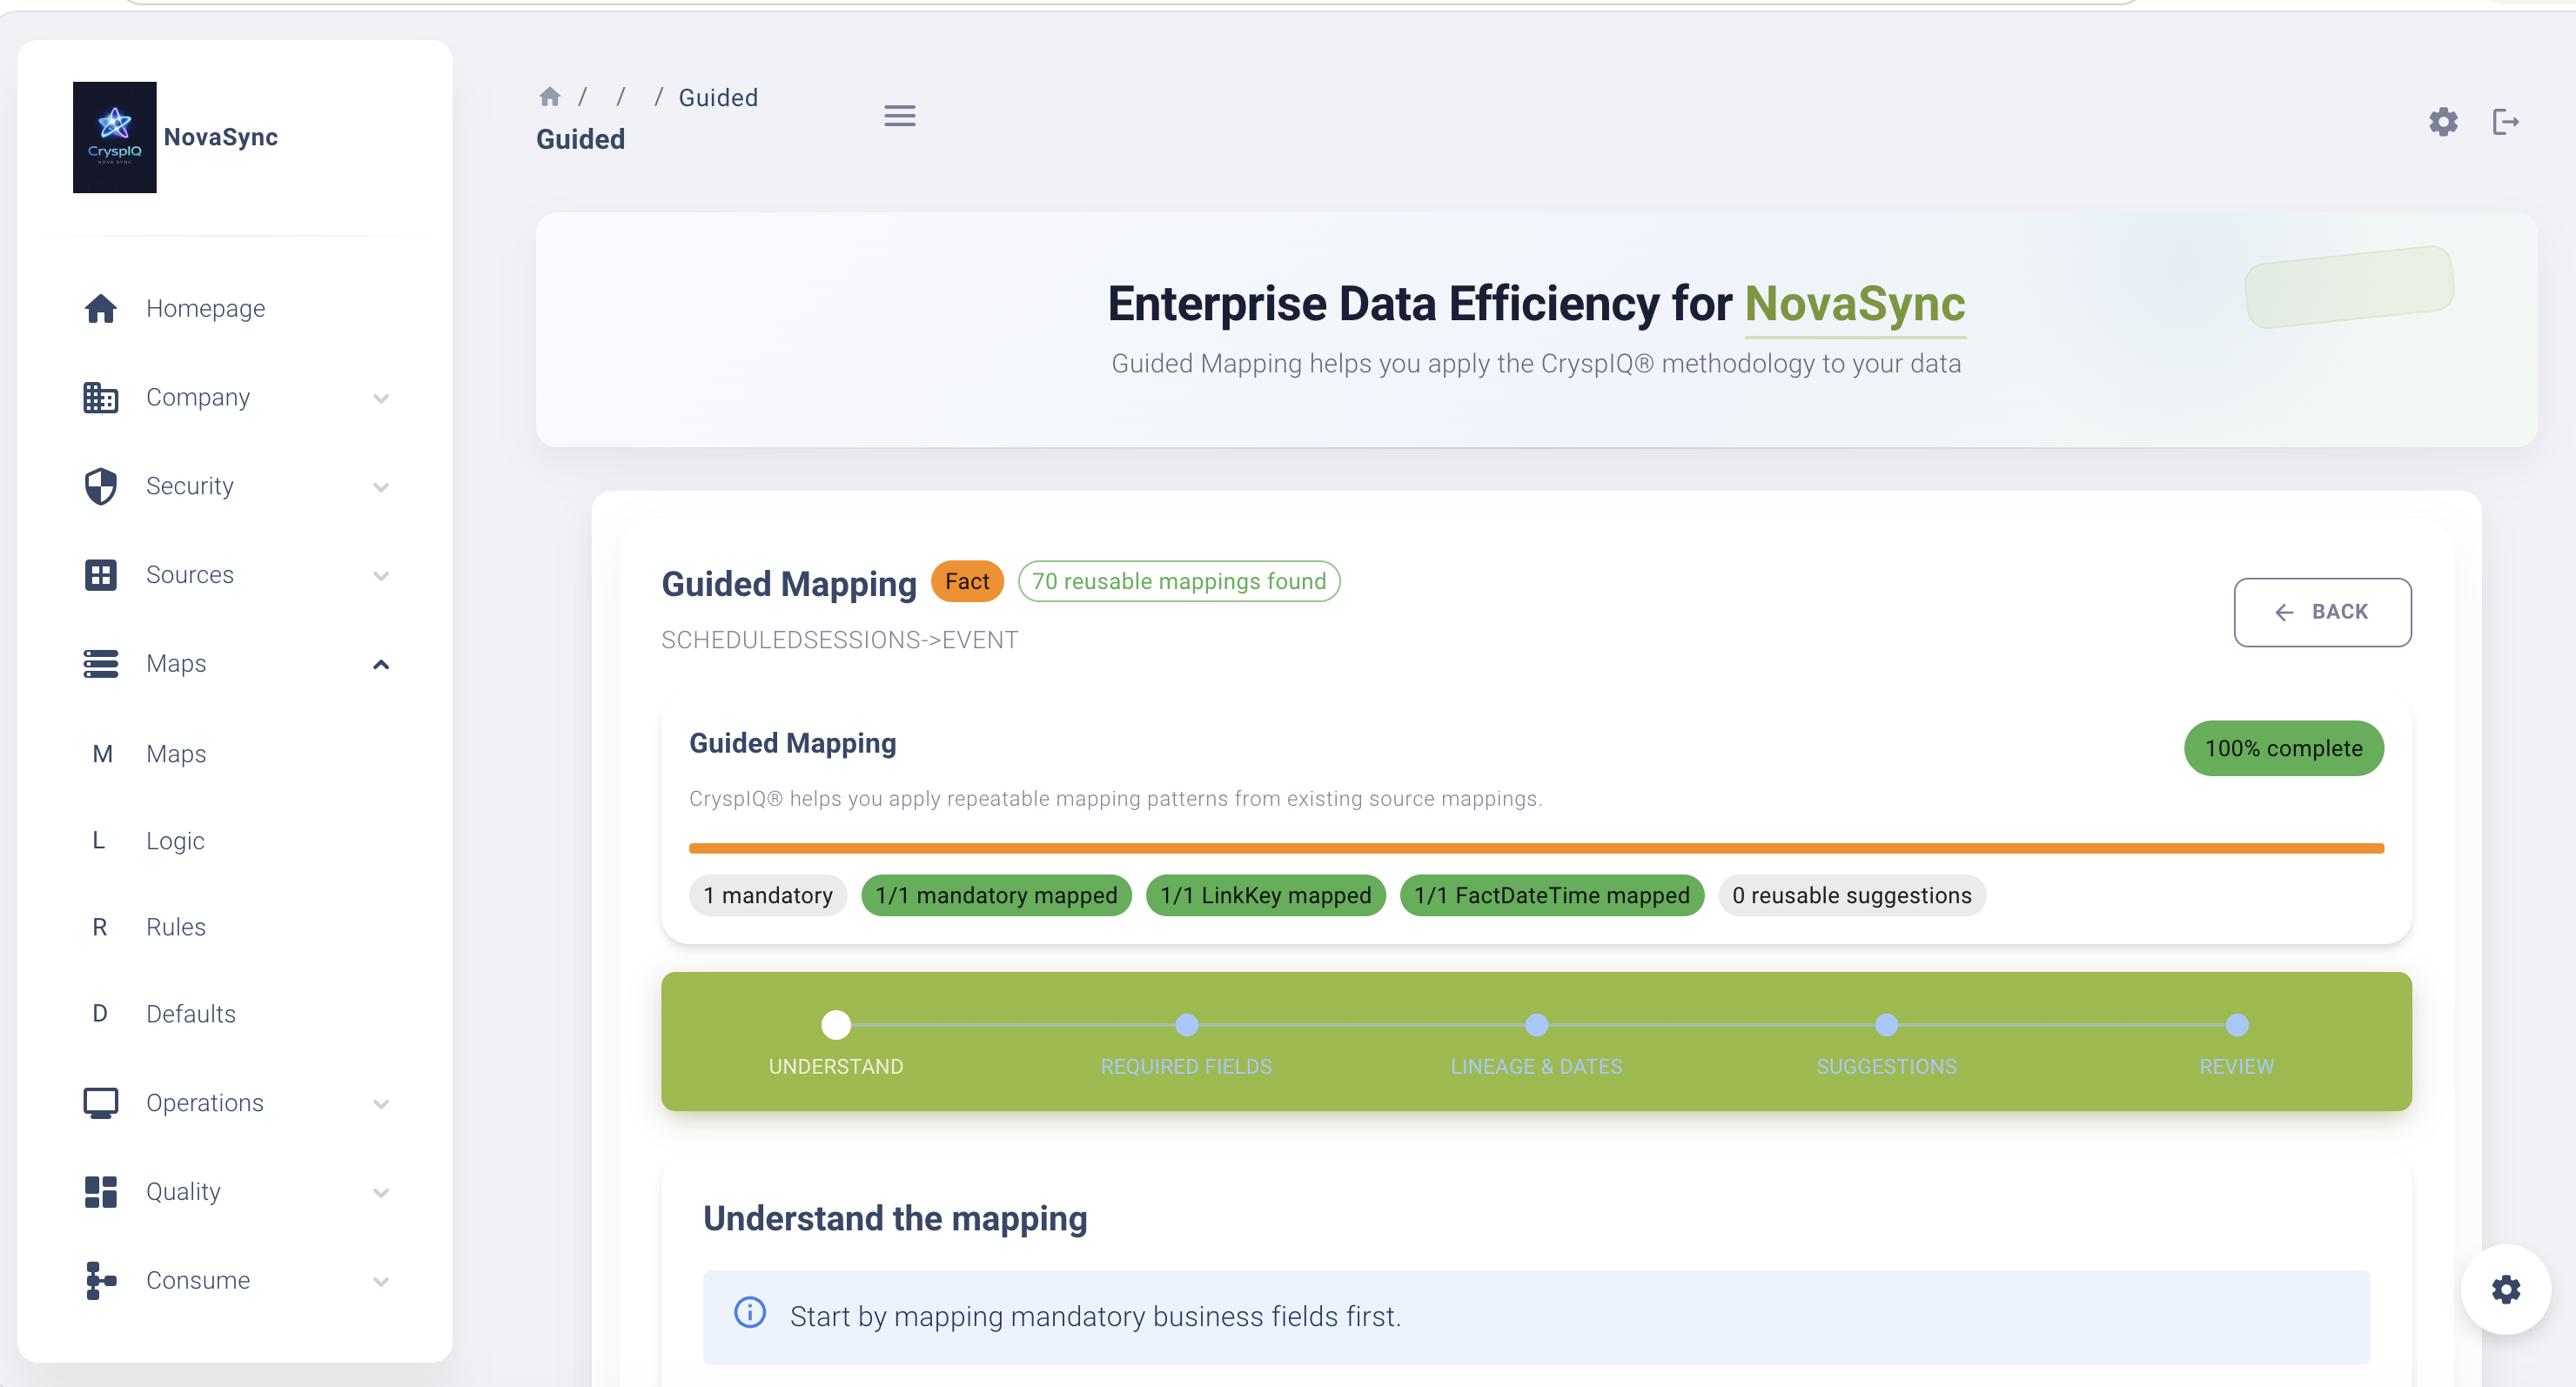
Suggested Mappings
CryspIQ® includes a guided mapping process with suggested mappings.
The engine reviews the source message and provides an initial mapping suggestion for the Data Administrator to validate.
This helps:
- Reduce manual mapping effort
- Speed up map creation
- Improve consistency
- Reuse previous mapping patterns
- Help users move through the process faster
Suggested mappings provide a starting point. The Data Administrator must still review and validate the mapping before saving.
Wizard-Style Mapping Process
The mapping wizard guides the Data Administrator through the mapping process.
Typical steps include:
- Select the Source Message.
- Review suggested mappings.
- Validate the Target Message.
- Confirm target fields.
- Apply defaults where required.
- Apply transformation methods where required.
- Apply data quality methods where required.
- Review the completed map.
- Save and activate the map.
Before You Start
Before creating a Message Map, ensure:
- You have Data Administrator access.
- The Source Message has been created.
- Source fields have been reviewed.
- The target business context is understood.
- Required defaults, transformations and data quality rules have been identified.
- You understand whether the data is master, reference or transactional data.
Navigate to Message Maps
From the main menu, go to:
Maps → Message Maps
The Message Maps page displays existing maps and allows Data Administrators to create, view, update or delete maps.
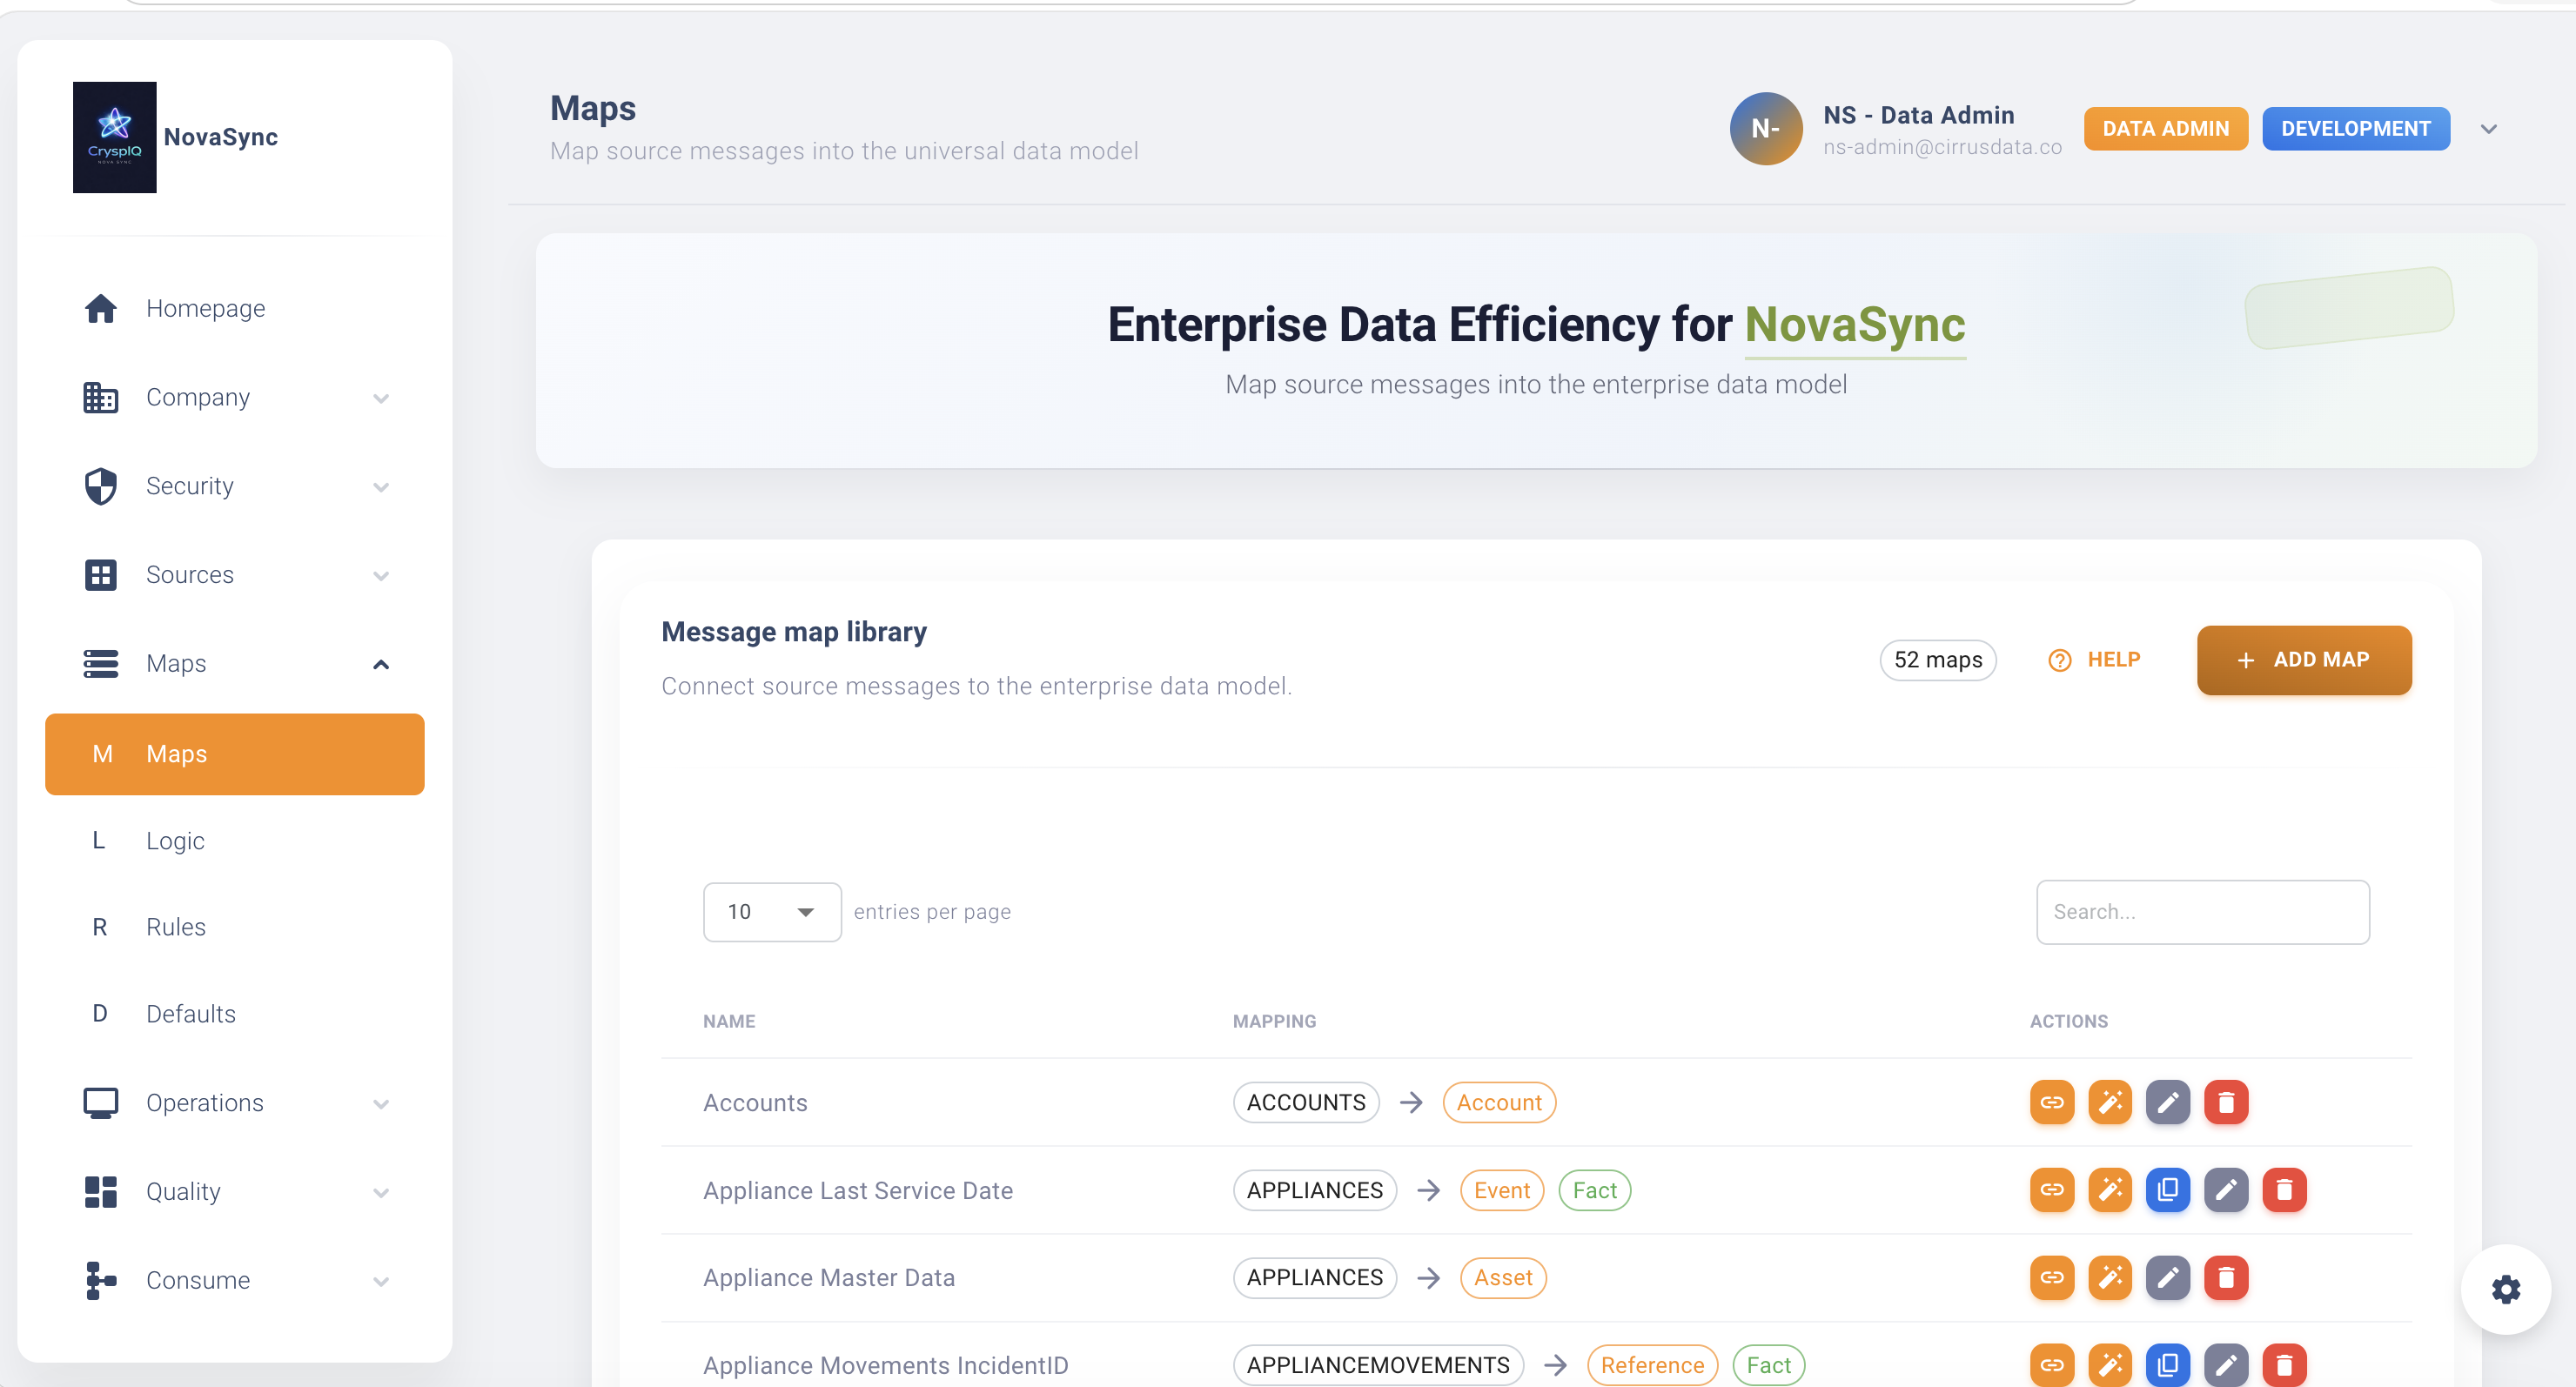
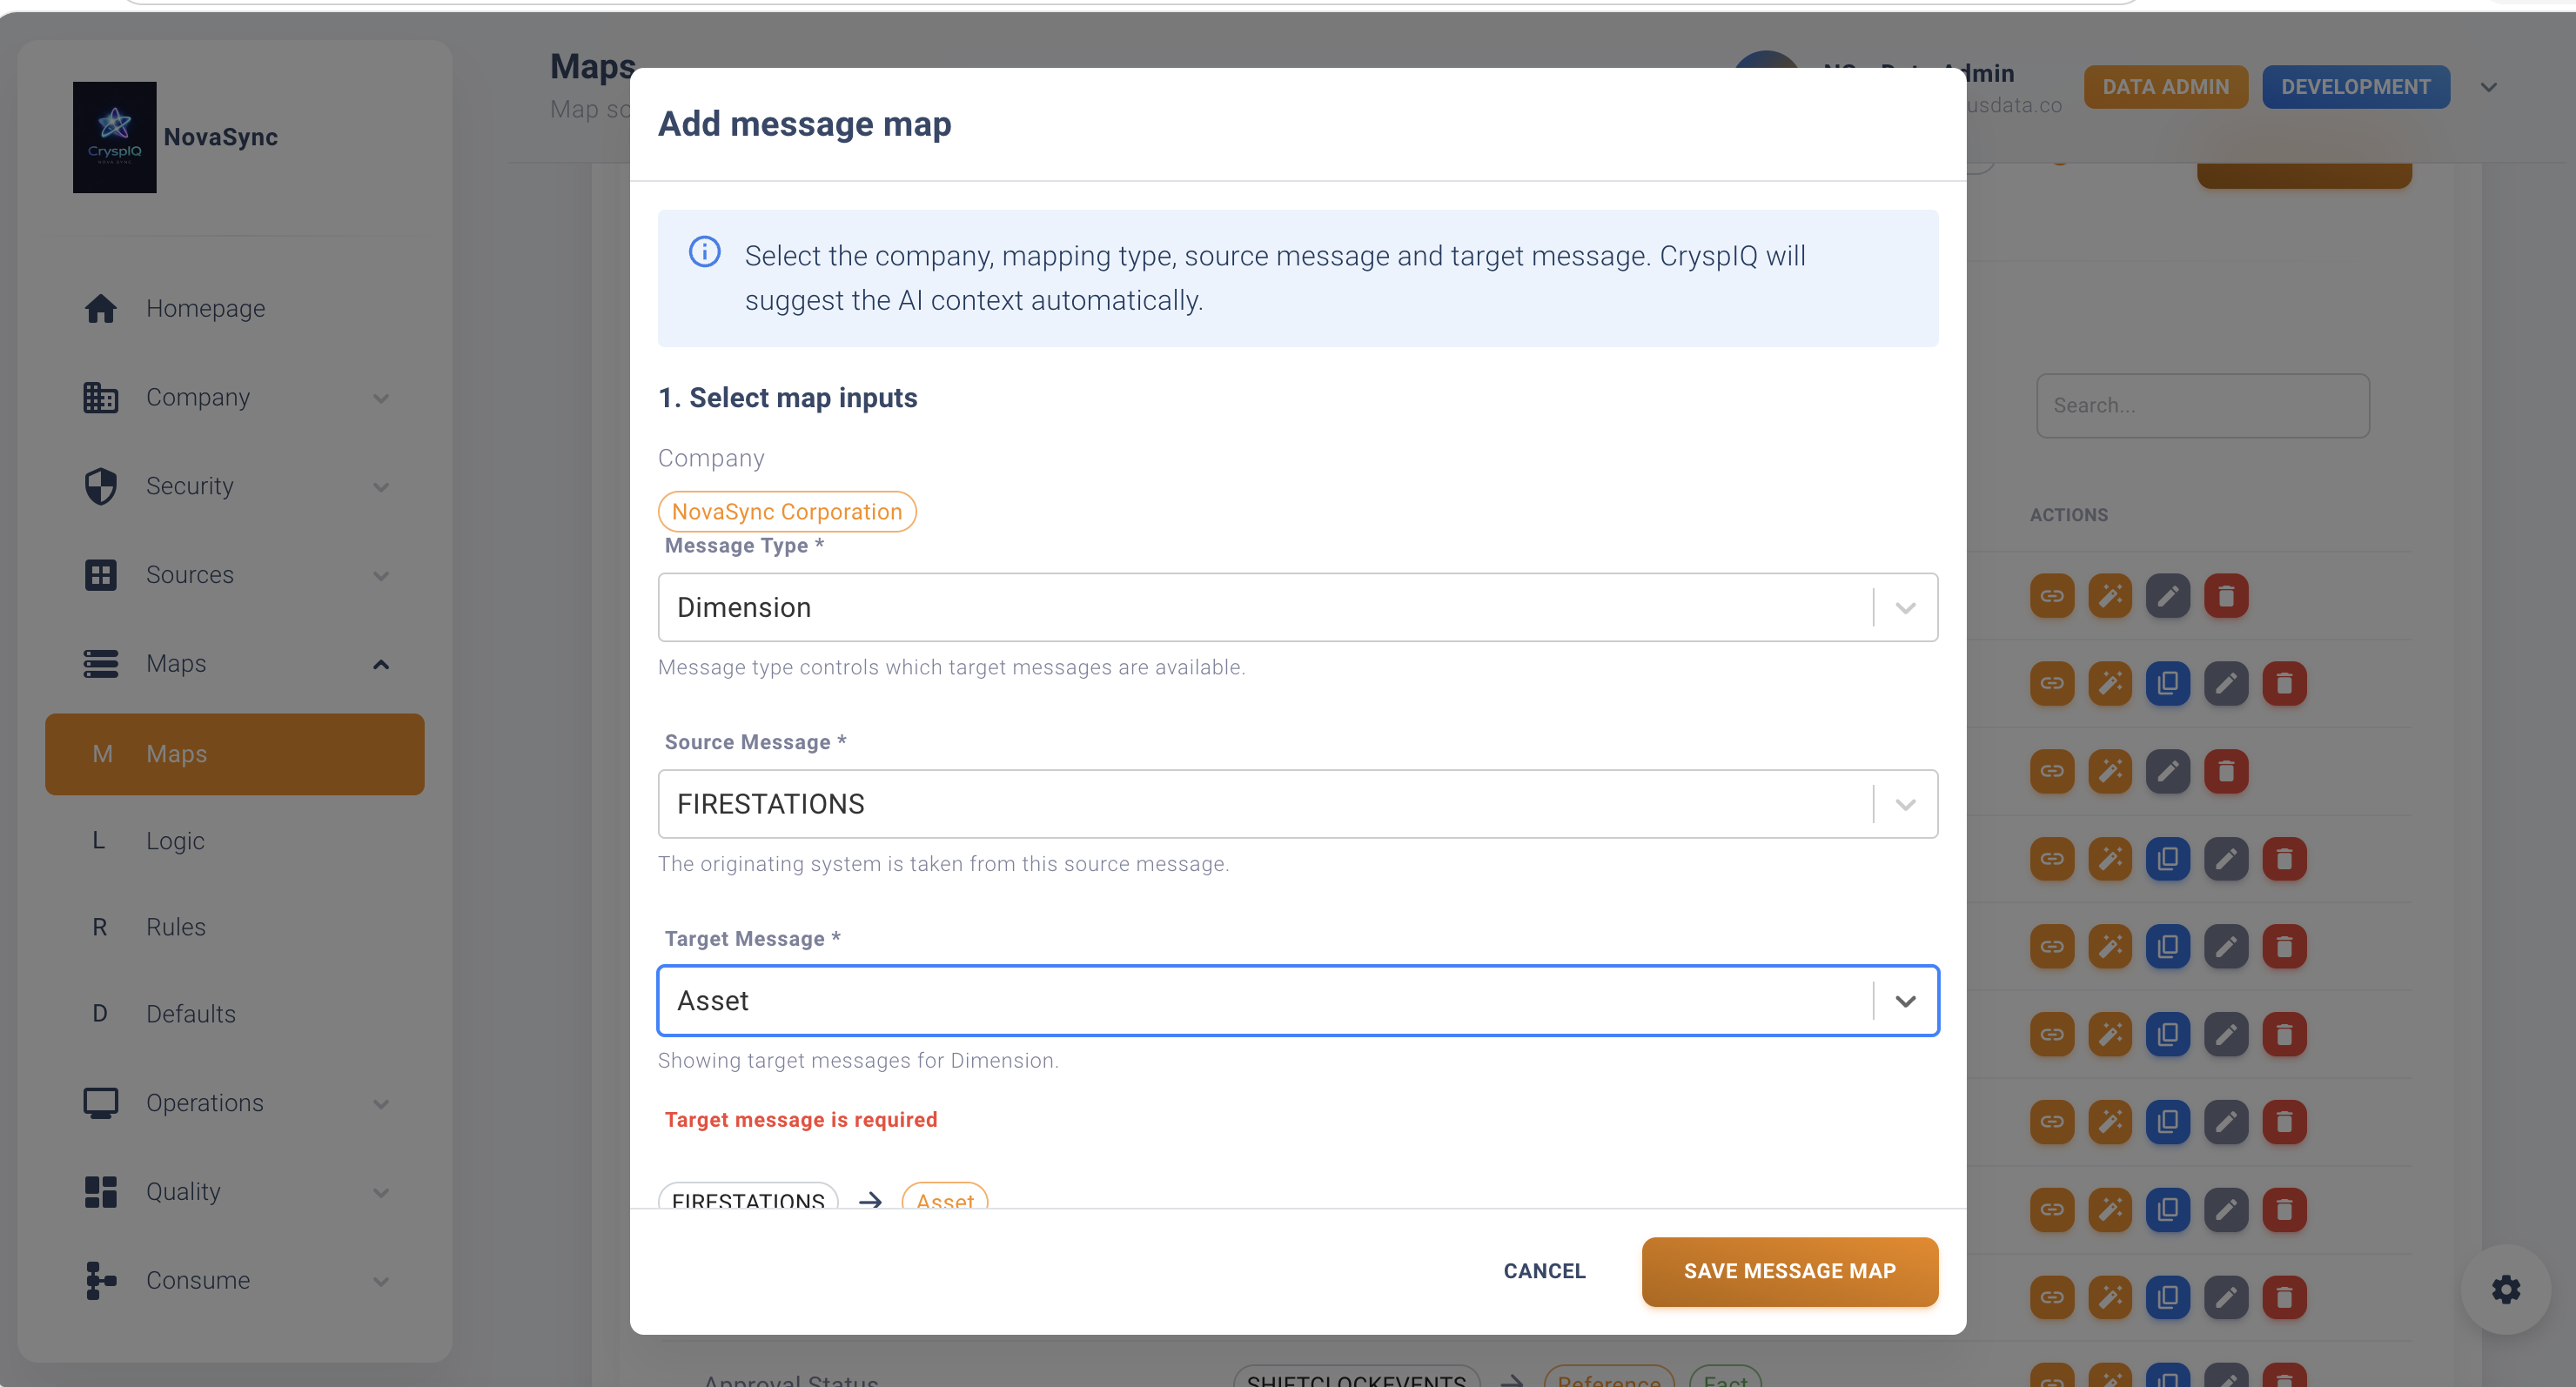
Create a New Message Map
To create a new map:
- Open Maps → Message Maps.
- Select Create Message Map.
- Choose the Source Message.
- Review the suggested mappings.
- Select the Target Message.
- Map source fields to target fields.
- Apply defaults, methods and data quality checks where required.
- Review the mapping.
- Save the map.
Review Suggested Mappings
CryspIQ® will suggest mappings where it can identify likely matches between source fields and target fields.
For each suggested mapping:
- Review the source field.
- Confirm the suggested target field.
- Accept the suggestion if correct.
- Change the target field if required.
- Leave unmapped fields only when they are not required.
Example:
| Source Field | Suggested Target Field | Action |
|---|---|---|
| CustomerId | Entity Business Key | Accept |
| CustomerName | Entity Name | Accept |
| InvoiceAmount | Fact Value | Accept |
| InvoiceDate | Fact Date | Accept |
| Notes | Not mapped | Review |
Map Source Fields to Target Fields
Each source field should be mapped to the most appropriate target field in the Enterprise Data Model.
When mapping a field, consider:
- What does the field mean?
- Is it a key, description, date, amount or classification?
- Does it identify a business object?
- Does it describe a transaction?
- Is it required for lineage?
- Is it required for reporting or AI?
Apply Defaults
Defaults can be applied when source data does not provide a required value.
Examples include:
| Scenario | Example Default |
|---|---|
| Source system missing country | Australia |
| Source record missing status | Unknown |
| Missing source type | Manual Upload |
| Missing business function | Finance |
Defaults help ensure data can still be processed consistently.
Apply Preparation Methods
Preparation methods can be applied during mapping to standardise or enrich data.
Examples include:
- Convert date formats
- Trim spaces
- Standardise casing
- Convert codes into descriptions
- Calculate derived values
- Combine fields
- Split fields
- Convert values into enterprise standards
Apply Data Quality Methods
Data quality methods can validate data as it arrives.
Examples include:
- Mandatory field checks
- Format validation
- Value range checks
- Lookup validation
- Business rule validation
- Duplicate checks
Data quality methods help identify problems early and support governance.
Edit an Existing Message Map
To update a map:
- Open Maps → Message Maps.
- Locate the map.
- Select Edit.
- Update the required fields, defaults or methods.
- Save the map.
Use this when:
- Source fields change.
- New target fields are required.
- Business rules change.
- Suggested mappings need refinement.
- Defaults or methods need to be updated.
Changing a map can affect future processing. Review downstream reporting, quality checks and integrations before making major changes.
View a Message Map
Use view mode to inspect a map without changing it.
This is useful when:
- Investigating processing issues
- Reviewing data lineage
- Understanding how source data is transformed
- Confirming how a field is populated
Delete a Message Map
To delete a map:
- Open Maps → Message Maps.
- Locate the map.
- Select Delete.
- Confirm the action.
Only delete maps that are no longer required.
Deleting a map may prevent uploaded or extracted source data from being processed.
Example Mapping Scenario
A source file contains invoice data:
CustomerId,CustomerName,InvoiceDate,InvoiceNumber,InvoiceAmount,Currency
The Data Administrator determines this is transactional financial data.
The map may be configured as follows:
| Source Field | Target Field | Context |
|---|---|---|
| CustomerId | Entity Business Key | Customer identifier |
| CustomerName | Entity Name | Customer context |
| InvoiceDate | Fact Date | Transaction date |
| InvoiceNumber | Fact Business Key | Invoice identifier |
| InvoiceAmount | Fact Value | Financial amount |
| Currency | Currency Code | Financial context |
Additional rules may include:
- Default country if missing
- Convert date format
- Validate invoice amount is numeric
- Apply currency lookup
- Assign finance business function
This creates meaningful financial activity that can be used for reporting, analytics and AI.
Mapping Checklist
Before saving a map, confirm:
- The source message is correct.
- The data type is understood.
- Suggested mappings have been reviewed.
- Required source fields are mapped.
- Business keys are mapped.
- Dates and periods are mapped.
- Measures and values are mapped correctly.
- Required contextual fields are mapped.
- Defaults have been applied where required.
- Preparation methods have been applied where required.
- Data quality methods have been applied where required.
Best Practices
Start with the Business Meaning
Do not map fields only by name.
Understand what the field represents in the business process.
Add as Much Context as Possible
The more context you add during mapping, the more useful the data becomes later.
Context improves:
- Searchability
- Reporting
- Analytics
- AI use cases
- Lineage
- Data quality
Validate Suggested Mappings
Suggested mappings are designed to help, but they should always be reviewed.
Map Business Keys
Always map fields that identify the source record or business object.
Examples:
CustomerId
InvoiceNumber
EmployeeId
AccountId
AssetId
Apply Methods Carefully
Use transformation and data quality methods to improve data quality at the point of ingestion.
Troubleshooting
Suggested Mapping is Incorrect
Update the target field manually before saving the map.
Source Field Cannot Be Mapped
Check whether:
- The correct Target Message has been selected.
- The target field exists.
- A new target field or method is required.
- The source field is needed.
Upload Fails After Mapping
Check:
- Required fields are mapped.
- Defaults are configured.
- Methods are working.
- Data quality methods are valid.
- The source file matches the Source Message.
Data Appears Without Enough Context
Review the map and confirm contextual fields are being populated.
Add defaults, methods or additional mappings where required.
Related Guides
Next Steps
After creating a Message Map:
- Upload or extract source data.
- Monitor Mapper Operations.
- Review Load Operations.
- Check Data Quality dashboards.
- Validate the data using the Query Library or Query Tool.
Message Maps are where CryspIQ® methodology is applied to source data, transforming raw fields into governed, contextual and trusted enterprise information.